Move a Platform with Animation in Unity
In a previous article, we showed how you can move a platform in Unity by using the function MoveTowards() and the function Mathf.PingPong(). You can find that article here. Another way to move a platform is to us an animation. This allows you to have some more complex movements fairly easily.
Create an animation for your platform in Unity. Start recording, and place your platform in the position you want to start it on a keyframe. Then place it where you want it to travel to on another keyframe. Finally, place it back where it started on a keyframe so that it loops.
How to Open the Animation Window in and Attach an Animation to an Object in Unity
If you have never used it, the animation window is probably not in view. You can open it by doing the following:
- Click ‘Window’ next to the ‘Help’ button towards the top left of the editor.
- Towards the bottom of the list click ‘Animation.’
- Finally click ‘Animation.’

The animation window will open and you can drag it to the position you want it in the editor. The window is shown below.

Select the platform gameobject you made in the Hierarchy window, and click the Create button in the Animation window. It will prompt you to save the animation, so make sure you save it.

After it is saved, your animation window will change its look. On the left, you’ll see the name of the animation, and on the right, you will see a timeline. The timeline is where you will place keyframes. Note that 0:05 does not mean 5 seconds. it really means 5/60 seconds or .083 seconds. 1:00 means 1 second.
The graph’s timeline is spread out fairly wide. You probably will not be able to see much more than about 1 second worth of time. To see more of the timeline, with the Animation window selected, use the roller on your mouse and rotate it towards you. The more you roll it toward you, the more time on the timeline you will see.
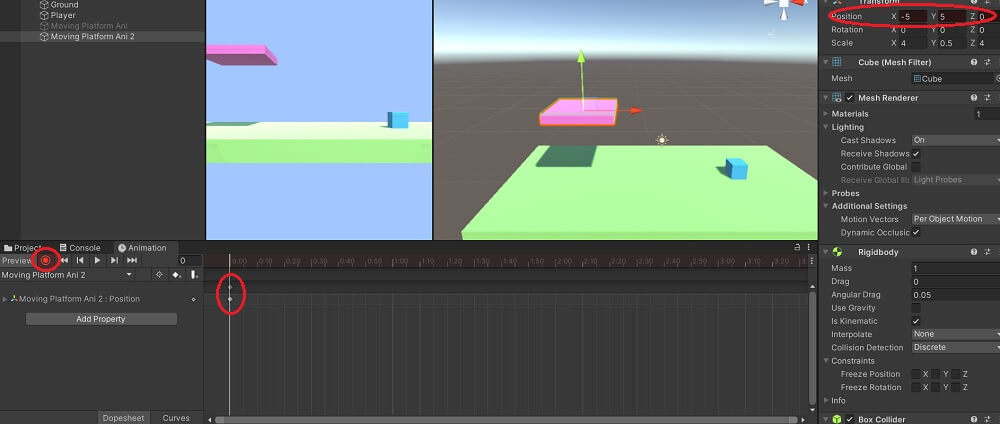
Next, make sure your platform object is selected, and click the record button at the left of the Animation window. Place the platform exactly where you want it to start in the animation. In my case, I will have it start on the left side of its route, so something like X = -5, Y = 5, Z = 0.
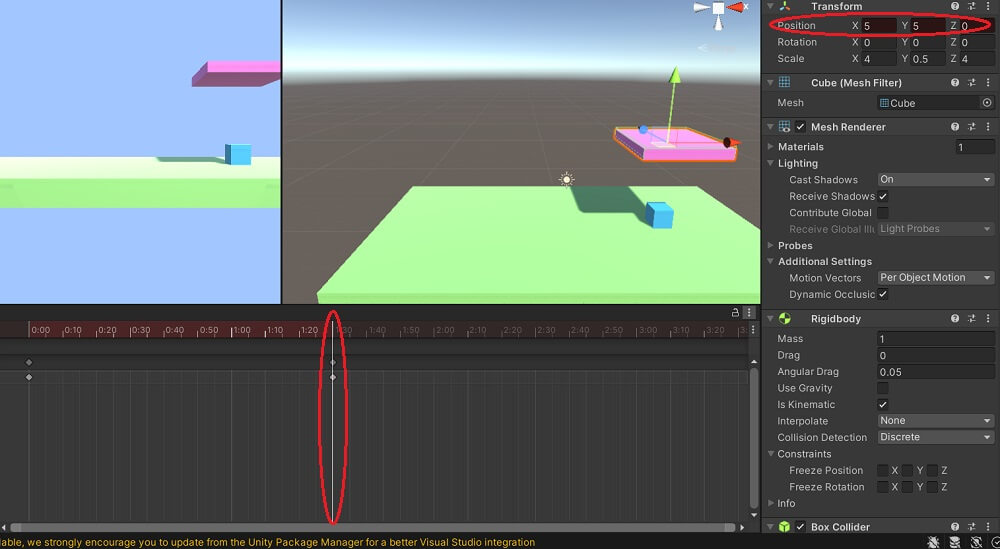
Now, while the animation is still recording, click a time on the timeline where the platform will be at the end of its route. Change the platform’s position to where you want it to go next. In my case, I put it to X = 5, Y = 0, Z = 0 at 1:30 on the timeline.

At this point, if you did no more to the animation, the platform would go from X = -5 to X = 5 and just stop. But with a platform, you usually want to it to go back and forth, so we need one more keyframe.
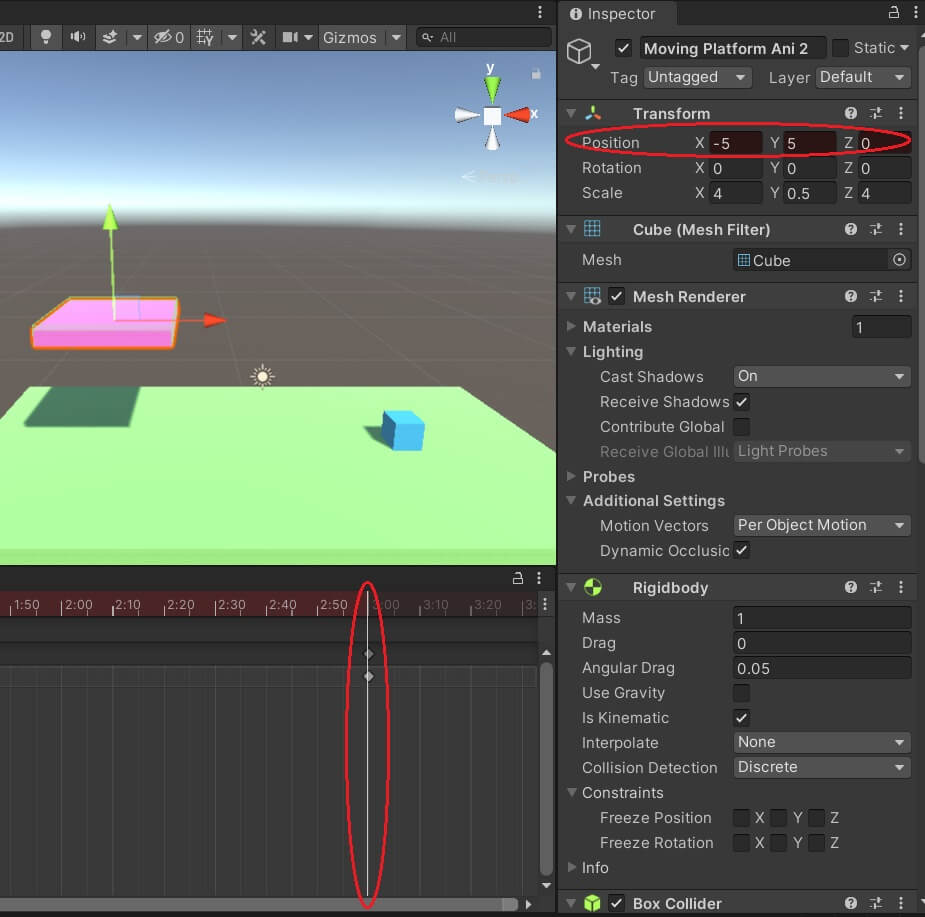
Make sure the record button is still on. Click a time on the timeline where the platform will be back at its starting position. Move the platform back to its starting point. My starting point was X = -5, Y = 5, Z = 0 at 3:00 on the timeline. Finally, click the record button again to turn it off.
Click Unity’s play button at the top of the editor and you should see your animation start at one point, move to the next point, and move back to the starting point. It should repeat this forever.
So your simple platform route is completed. Very nice for not having to write one line of code. If you need to prepare the platform to allow the player to stay on it while it moves, I recommend checking out this other article that also discusses moving platforms.
Make a Moving Platform with Multiple Stops
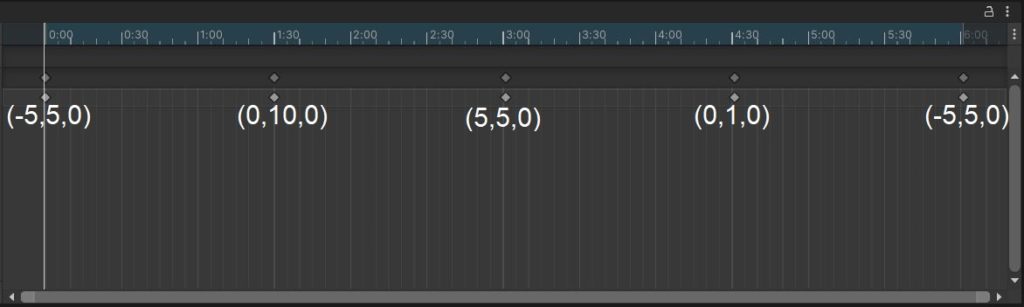
Sometimes we need a platform to make multiple stops. Using an animator to achieve this is also fairly simple. In this example, there will be four position the platform will move to: it will start at -5,5,0, then go to 0,10,0, 5,5,0, 0,1,0, and finally back to -5,5,0. See image below for a visual of these locations.

To do this, we use an animation and add five key frames. I put the key frame at 0:00 on the timeline at position -5,5,0, a frame at 1:30 at 0,10,0, a frame at 3:00 at 5,5,0, a frame at 4:30 at 0,1,0, and a frame at 6:00 back at -5,5,0. Check the image below.
This causes the platform to continuously move between the 4 locations. They do not stop at any one point. However, if you wanted the platform to stay at a certain location for a moment, you can do that. For example, we could stop it at 0,10,0, the second keyframe, for 1 second, then allow it to go to the third keyframe.
To do this, I would add a key frame at 2:30 on the timeline and make the location of the platform be 0,10,0. Because it was already at that position when it reached the second keyframe, the animation will still run, but it won’t move toward 5,5,0 until 2:30 on the timeline has passed.
Animations allow for so much flexibility with moving objects. Remember, you can also rotate and scale objects at certain keyframes to manipulate the movement and shape even more. So do a lot of experimenting with animations, and you may come up with some very unique and stylized gameplay.