What is a Rigidbody in Unity?
If you are using a GameObject that needs to interact with Unity’s physics engine, then you need a Rigidbody component added to it.
A Rigidbody component allows you to control a GameObject‘s position and movement and mass through realistic physics calculations already built in Unity.
There are many properties and functions associated with Rigidbodys, and it would take a very long time to list and explain everything about them. So, for now, we will consider the properties on the Rigidbody component in the Inspector Window when you add a Rigidbody onto a GameObject.
The Rigidbody Component
Adding a Rigidbody Component to a GameObject is the same as adding any other component. Select your GameObject, then in the Inspector, select the “Add Component” button and search for Rigidbody. If you are using a 2D GameObject, then you would want a Rigidbody2D component.

As you can see, there are nine main sections in a Rigidbody Component. The top eight sections handle attributes of the GameObject. Let’s go through them one-by-one and see how editing their values changes how GameObjects react in the scene.
Mass
The first property in the component is Mass. This is the scientific term that means the amount of matter that’s in an object. The more mass an object has, the heavier it is, and the harder it is to move or push. Unity defaults every Rigidbody to a mass of one unit. The higher the value of the mass, the heavier the GameObject is.
You can make the mass relationships between your GameObjects however you like. For example, a mass of one can equal that of a human and a mass of 20 can be that of a car. Or you can say a mass of one equals one kilogram, whatever works best for your game.
But note that just because an object is heavy, it does not mean it will fall faster than a lighter one. This is true in real life as well. Objects fall at the same speed unless other factors are involved.
In the first screenshot below, the blue cube and the red cube have a mass of one. The blue cube is using AddForce() to move toward the red cube. You can see it easily pushes the red cube to the right.
In the next screenshot, the blue cube still has a mass of one, but the red cube now has a mass of 20. The red cube hardly moves at all when the blue cube is forced into it.


Drag
The next property is drag. Basically, this is a slowing force from air or water as an object passes through it. It acts like friction.
So unlike the mass of an object, drag will affect how fast (or slow) an object falls to the ground. The higher the value of drag in the Rigidbody component, the more drag there will be, and the slow a GameObject will pass through the air.
In the screenshot below, the blue cube has zero drag and the red cube has a drag value of one. Therefore, the red cube will hit the ground first if they are both dropped from the same height.

Angular Drag
Angular drag refers to the drag placed on an object’s rotational movement. So the higher the value of angular drag, the slower a GameObject will spin due to the influences of physics.
Use Gravity
This property is probably self-explanatory from the name. When the box is unchecked, gravity has no effect on a GameObject. You can place it in the air, and it will not fall. However, physics still affects it. If another GameObject that uses gravity is placed on top of it. That second GameObject’s mass will cause the first GameObject to fall to the ground.
IsKinematic
This property, when selected makes it so that no physical forces or GameObjects will have any affect on that GameObject. For example, you can place a GameObject with IsKinematic in the air and keep the Use Gravity property on, but the GameObject will fall. Nor will other GameObjects be able to push that GameObject. You will have full control over the movement.
So a Rigidbody GameObject that uses IsKinematic can use physics on other GameObjects. It can move and push them, for example, but they cannot move or push the GameObject with IsKinematic activated. Therefore, it is the ultimate bully.
Interpolate
This is a property that takes a little explanation and visuals to really understand. The meaning of interpolate, according to Merriam-Webster is “to estimate values of (data or a function) between two known values.” In other words, if we are going to interpolate a value, we are using existing values to get an estimate of what we think that value will be.
This is exactly what is happening in the case in Unity. Interpolation, in Unity, is to smooth out physics-based movement. It checks previous speed values to estimate where the Rigidbody will be at the next physics update. Let’s look at each of the options for this property of a Rigidbody.
None- This is the default selection. In this case, Unity is not trying to smooth out movement. If the movement in your game is already smooth and not glitchy, you may be just fine keeping this default setting.
Interpolate- This setting uses the data from the two previous physics updates. It looks at the orientation of the Rigidbody and its velocity. With that data, it predicts an accurate value for the Rigidbody’s orientation and velocity.
For example, if your Rigidbody’s forward axis is pointed toward the positive Z axis and is moving at a velocity of five units per second during the past two physics updates, the interpolate setting will keep similar values for the next physics update.
This is said to be more accurate than the extrapolate setting, which will be explained below. But to be more accurate, it has to take more time with its calculations. Therefore, it lags behind one physics update.
Per Unity, it is the best choice for when the Rigidbody’s velocity varies or if other physics processes that may affect its movement. And you will probably not notice a delay of one physics update.
Extrapolate- This uses the last physics updates’ values to determine the current frame’s orientation and velocity. So unlike the interpolate property, extrapolate only uses the data of one physics update as a reference. Because of that, it is not as accurate as interpolate, and will move a little too fast, being slightly ahead of a Rigidbody using the None or Interpolate settings.
In the example below, the blue cube’s Interpolate value is None, the red cube’s value is Interpolate, and the green cubes’ value is Extrapolate. Each cube starts at X = -9 and accelerate at the same velocity using the AddForce() function along the positive X axis. Look at the pictures to see what happens.


As you can see in the example above, it is just as was said. The red cube using interpolate is a little behind the blue cube that uses no interpolation or extrapolation. And the green cube, which uses extrapolation, is a little ahead of the blue cube.
Collision Detection
This property is used to dictate how the physics system detects a collision between the Rigidbody’s collider and another collider in the scene. There are three types of detection.
Discrete- This setting is used when the Rigidbody is not in high speed collisions. It is less taxing on the processor, so it is good to use if you are not worried about high speed collisions.
Continuous- This is the most computationally intensive option. According to Unity, it uses a “sweep-based CCD” for calculating collisions between Rigidbody’s colliders and colliders that have no Rigidbody attached to them.
If you look more into the documentation, you’ll find that a sweep-based CCD (continuous collision detection) uses an algorithm to look ahead in the forward trajectory of a GameObject. Looking ahead, it will find if the GameObject will come in contact with any other GameObjects in its path. It then will compute how long it will take to collide and keep moving the object until the collision.
A major detail to note is that this type of detection does not work well detecting collisions with an object that is moving at an angular motion, one that is rotating. Save that thought for a little later, though.
Continuous Dynamic- Just like Continuous detection, Continuous Dynamic detection is computationally intensive, more so than Discrete and Continuous Speculative.
The difference between this and just Continuous detection is that Dynamic detection is supposed to be used with high speed collision with any collider, including colliders with an associated Rigidbody. So if there’s a good possibility the Rigidbody will collide with any other type of collider at high speed, use this instead of Continuous.
Continuous Speculative- The final type of detection is used to handle collisions between the Rigidbody’s collider and all other colliders, ones with Rigidbodies and ones without Rigidbodies. This type of detection is not as accurate as Continuous or Continuous Dynamic, and is therefore less computationally intensive than either.
Remember when I said the Continuous detection from above will not detect collisions with GameObjects having angular motion? Well Continuous Speculative does detect angular motion collisions. This is because it uses an algorithm that picks all possible collisions during the next physics step. This keeps the Rigidbody from going through a possible collision.
For example, if there is a long, stick-like GameObject that is rotating and a ball is in its path, it will detect the collision. If you were using just Continuous or Continuous Dynamic, the collision probably would not be detected.
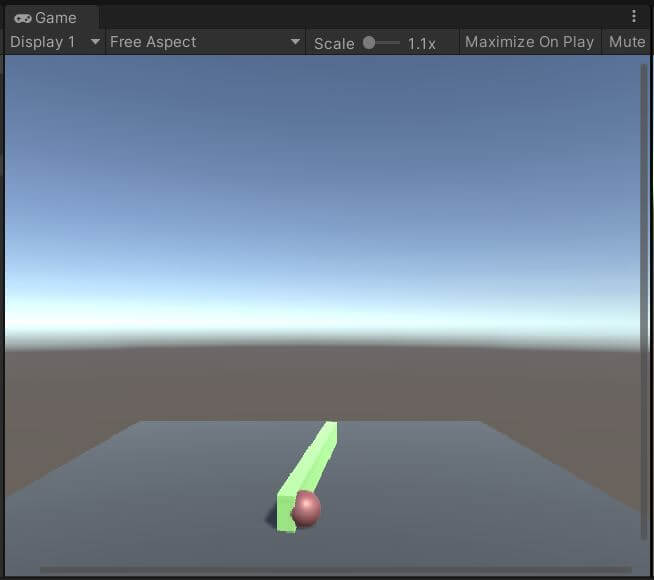
Note that even with Continuous Speculative detection, collisions can be glitchy. Sometimes you have to do a lot of testing to get your desired result with collisions. For example, using Continuous Speculative Collision below, the long “stick” GameObject below is rotating toward the sphere.
At a rotational speed of 100 degrees per second, the stick GameObject and sphere will collide. But increasing the rotational speed to 360 degrees per second causes the the stick to pass right through the sphere with little effect on the sphere.
Constraints
Back to an easier property to explain. The Constraint property restricts how a Rigidbody moves and rotates.
Freeze Position- This option allows you to freeze movement on any axis, X, Y, or Z. You can freeze movement on any and all axes.
Freeze Rotation- Just like Freeze Position, this allows you to freeze the rotation of a Rigidbody on any and all axes .
Info
The final section of the component is the Info section. This gives information about your Rigidbody while the game is running. It shows things like velocity, center of mass, rotation, and more.
Why Use a Rigidbody?
A Rigidbody component is extremely useful when you need to use realistic physics in your game. You can control movement and other attributes like mass, drag, and other properties to change how a GameObject interacts with the world and other GameObjects around it.
It can be a little glitchy, especially with collision detection. But all in all, it is extremely useful and imperative to learn about.