How Do You Clamp Movement in Unity?
You don’t want your player or enemy to walk wherever they want. Well, maybe you do. But if you want your characters or other objects to stay within certain bounds, you will need to write code for that, and there are a few different ways you can do it.
To restrict, or clamp, movement in Unity, you can use if() statements and a Vector structure to make a gameObject’s position no less or greater than the boundary. You can also use the Mathf.Clamp() function to restrict movement passed a specified boundary. Mathf.Clamp() is a more compact solution.
Moving an Object Using Player Input In Unity
Before we can focus on clamping or restricting movement, we have to create an object that can move with player input.
To move an object in unity using player input, you need to access the class Input.GetAxis() for the axes. You can then store the axis data as a variable and create a direction of movement using a vector with x, y, and z data. You then multiply that direction by a speed and Time.deltaTime to smooth out movement.
 void Update()
    {
            float horizontalInput = Input.GetAxis("Horizontal");
            float verticalInput = Input.GetAxis("Vertical");

            Vector3 direction = new Vector3(horizontalInput, 0, verticalInput);

            transform.Translate(direction * speed * Time.deltaTime);

    }
float horizontalInput = Input.GetAxis(“Horizontal”); – This isn’t important for this example either, but it declares a variable named horizontalInput, and then initializes it to control the horizontal axis in Unity’s Input Manager. This will be used to move the player along the Z axis.
float verticalInput = Input.GetAxis(“Vertical”); – This declares a variable named verticalInput, and then initializes it to control the Z axis in Unity’s Input Manager. This will be used to move the player along the Z axis. Z axis isn’t the vertical axis, but the variable was named verticalInput to better describe the axis it retrieved from the Input Manager.
Vector3 direction = new Vector3(horizontalInput, 0, verticalInput); – This line declares a Vector3 variable named direction and for the x value uses horizontalInput and for the z value uses verticalInput to move the player left, right, forward, and backward.
transform.Translate(direction * speed * Time.deltaTime); – This line uses the transform.Translate function to move the character in the direction the player chooses. direction is the Vector3 which is multiplied by the speed variable to move the player. It is then multiplied by Time.deltaTime, because if it wasn’t movement would be ridiculously fast.
Restrict X Axis Movement with Conditional Statements
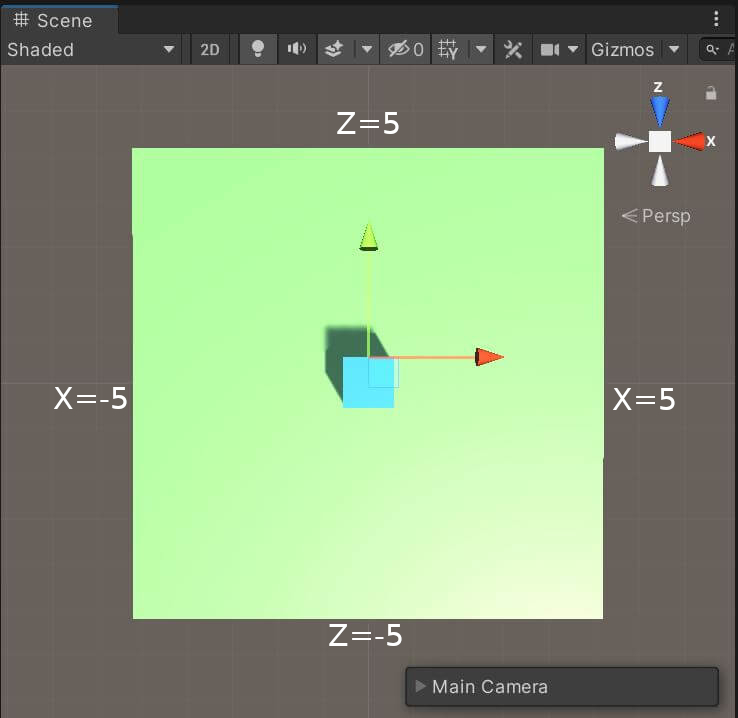
One way you can limit an object’s movement is through conditional statements. You can use if() statements to check if the player has reached a certain value on the x, y, or z axes. The code below is part of Unity’s Update() function after the movement code. In this block we will not allow the gameObject to move passed -5 and 5 on the X and Y axes.
        if(transform.position.x <= -5)
        {
            transform.position = new Vector3(-5, transform.position.y, transform.position.z);
        }
        else if (transform.position.x >=5)
        {
            transform.position = new Vector3(5, transform.position.y, transform.position.z);
        }
if(transform.position.x <= -5) – This if() statement is checking the X value of the gameObject’s transform position and compares it to -5. It checks if the gameObject’s position is less than -5. If it is, the code within this if statement is executed.
transform.position = new Vector3(-5, transform.position.y, transform.position.z); – This statement sets the gameObject’s position to a new Vector3. Remember that a Vector3 has takes three values. In this case, a value for the X, Y, and Z values of the gameObject’s position.
The first value in the Vector3 is the X position, which is -5. Remember that we are not allowing the gameObject’s X value to be less than -5. So once we check if it is less than -5, if it is, then we automatically set the X value to -5. The gameObject’s X value will never be lower than -5.
The next value in the Vector3 is the Y value, or transform.position.y. This value is the Y value of the gameObject. We use transform.position.y because we don’t want to change the Y value when we are checking for movement along the X axis. It just doesn’t need to be changed. We are only worried about the X value within this if statement.
The third value in the Vector3 is the Z value, or transform.position.z. Again, we are not checking the Z value in this if statement, so we just leave it alone, which means setting it to the Z value the gameObject already has: transform.position.z.
else if (transform.position.x >=5) – Next, we check if the gameObject has moved passed the positive X boundary, which in this case, is 5. Here we use the else if() statement. The else if() statement is added to an if() statement to check if another condition is true, if the first condition is false. We are checking if the gameObject has passed an X axis value of 5.
transform.position = new Vector3(5, transform.position.y, transform.position.z); – This statement sets the gameObject’s position to a new Vector3. Remember that a Vector3 has takes three values and so is perfect for a 3D position. It sets a value for the X, Y, and Z values of the gameObject’s position.
This is basically the same as the first if statement. Once the gameObject reaches 5 on the x axis, it’s position is set to no greater than 5 so it cannot move passed it. The Y position is not changed so it is set to transform.position.y, and same for the Z position.
Restrict Z Axis Movement with Conditional Statements
Next, we will restrict movement on the Z axis. Remember the Z axis in Unity represents forward and backward movement in the world space. The logic for restricting movement on the Z axis is the same as the X axis.
if (transform.position.z <= -5)
        {
            transform.position = new Vector3(transform.position.x, transform.position.y, -5);
        }
        else if (transform.position.z >= 5)
        {
            transform.position = new Vector3(transform.position.x, transform.position.y, 5);
        }
if (transform.position.z <= -5) – Here again, we are using an if() statement. This time it is to check if the gameObject’s Z position is less than -5. If it is, then the code within this if() statement will execute.
transform.position = new Vector3(transform.position.x, transform.position.y, -5); – This line creates a new Vector3 to set to the gameObject’s position. We are only worried about the z position. So the X position and Y position will be set to what the gameObject’s X and Y positions already are. We show this by setting the X position to transform.position.x and the Y position to transform.position.y. We then set the Z position to -5 so that it cannot go any lower than -5.
else if (transform.position.z >= 5) – Next we use an else if() statement to check if the Z position is greater than 5. If it is, then the code within the if() statement will execute.
transform.position = new Vector3(transform.position.x, transform.position.y, 5); – This line creates a new Vector3 to to the gameObject’s position. It sets the current X and Y position of the gameObject to transform.position and sets the Z position to 5. Therefore, the gameObject cannot go any higher than 5 on the Z axis.
That’s it for the logic. Note that the position of a gameObject in Unity is automatically assigned to its center. So in this example, we use a 1 x 1 x 1 unit cube. If the Cube moves to the boundary, 5, on the X axis, the cube’s midpoint will have a value of 5. However, the right face of the cube will be at 5.5. This is technically passed the bounds. So if you don’t want any of the cube to go passed the boundary of 5, you would make the boundary 4.5 instead.
Restricting Movement with Mathf.Clamp
What if I told you there was a function that you could use for restricting movement without all those if() statements? Mathf is a class that provides programming functions for mathematical calculations and functions. The Clamp function restricts a value between two floats. This function can be used to restrict a gameObject’s movement. It also takes less code. Let’s get into it.
transform.position = new Vector3(Mathf.Clamp(transform.position.x, -5f, 5f),
            Mathf.Clamp(transform.position.y), transform.position.z, -5f, 5f);
To restrict the movement of a gameObject in Unity, create a new Vector3, and use Mathf.Clamp to clamp any of the X, Y, and Z positions of the gameObject, specifying the minimum and maximum values of these positions.
This code can replace the if() statement used for the boundary logic earlier in this post.
transform.position = new Vector3(Mathf.Clamp(transform.position.x, -5f, 5f), transform.position.y, Mathf.Clamp(transform.position.z, -5f, 5f)); – In this code we are assigning the gameObject’s position new values. We use a Vector3 to hold these new values.
The first value of the Vector3 structure will be used as the X position. As you can see, you use the X’s position, then there are two other float values. The first value, -5f, is a boundary on the X axis. So, this is the boundary on the left side, or negative side, of the X axis. The second value, 5f, is the boundary on the right, or positive end of the X axis.
The next value will be used for the Y position. In this example, the gameObject does not move along the Y axis, so we do not need any boundaries along the Y axis.
The last value is used for the Z position. he first value, -5f, is a boundary on the Z axis. So, this is the boundary on the left side, or negative side, of the Y axis. The second value, 5f, is the boundary on the right, or positive end of the Z axis.
Wrapping Up
As you can see, you have several options for boundaries in Unity. The first option using conditional statements does the job, but it takes a bit of code to do. If you want to use less code, Mathf.Clamp() is the perfect function to use. Just use the function for any position you value you need to clamp: x, y, or z. Use it in the exact spot you would normally put a gameObject’s position in a Vector3() (or Vector2 for 2D).
Also, remember that an object’s position is at its center by default. So make sure to allow enough room for the length, width, or height of an object to stay inside your specified boundaries.