Basic Movement in Unity
Not much is probably going on in your game if there is no movement. It is an integral part of most games. Fortunately, Unity makes it easy to get GameObjects moving very quickly. You can then tweak specific variables to get exactly the kind of movement you want.
Basic movement in Unity can be done by moving the transform of the object by, for example, Transform.translate() along the X, Y, or Z axis. When you are working with the physics engine and RigidBodies, you can use the AddForce() method with different force modes.
There are different functions that can be used for movement of GameObjects. Read more to find out about each one with examples.
Transform.Translate In Unity
One of most basic ways to control movement of a GameObject in Unity is to Use Transform.Translate(). What does this function do?
Transform.Translate is a function from the Transform class that moves a transform in the distance and direction of its Vector parameter. You want to multiply this function by certain values to speed up or slow down the movement, or translation.
Transform is a class in UnityEngine that is a component of a GameObject. It allows you to edit the position, rotation, and scale of an object.
When you add a GameObject to a scene, it automatically has a Transform component attached to it. This component allows you to edit the position, rotation, and scale (or size) values of that GameObject.
As was mentioned, you can edit the values in the Transform component in the Inspector window of the Editor to change the positioning and size of a GameObject. However, if you need those values changed while a game is running, you need to edit them with code in a script. Below is a visual of what changing the position, rotation, and scale of an object will do.
Here is the syntax for the Transform.Translate function:
public void Translate(Vector3 translation);public void Translate(new Vector3 translation); – In this declaration, the single parameter translation will be a Vector3 that holds three values. The first value will be for the X axis, the second for Y, and the 3rd for Z. Doing it this way, you need the keyword new before the Vector3 For example, if you would like to move positively along the X axis, you would use the code below:
transform.Translate(new Vector3(1, 0, 0));The “new” keyword tells the computer that space is needed for the specified datatype.
If you need to move an object negatively down an axis, just add “-” in front of the axis value like is done below:
transform.Translate(new Vector3(-1, 0, 0));Note that this code will move a GameObject along the X axis, but by default, it will move it 1 meter per frame. So it will move it 1 meter each time the Update() method is called, which is once per frame. This means that its movement can vary drastically, depending on how many frames per second the game is running at.
This is probably not what you want, so to fix this, you will have to multiply the Vector3 by Time.deltaTime. According to Unity, this is the “interval in seconds from the last frame to the current one.” I other words from Unity: it “returns the amount of time in seconds elapsed since the last frame completed.” It is essentially the time between each update or fixed update function call.
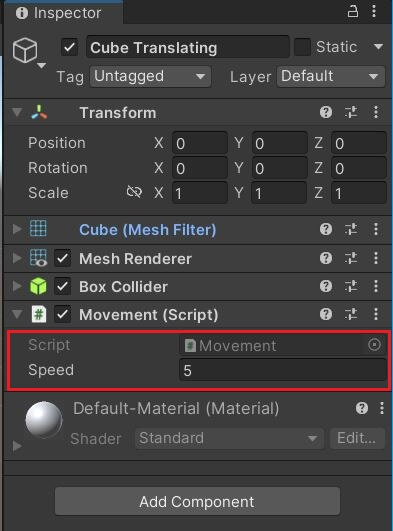
This will make your GameObject move at exactly 1 meter per second. But in a game, objects move at all kinds of speeds. Therefore, to get a different speed you will need to multiply the the current speed by a variable of a certain value. This code is below, and this time we will show the whole script file since we need to explain the variable as well.
using UnityEngine;

public class Movement : MonoBehaviour
{
    [SerializeField] private float speed = 5;

    void Update()
    {
        transform.Translate(new Vector3(1, 0, 0) * Time.deltaTime * speed);
    }
}
[SerializeField] private float speed = 5; – Here you declare a private float variable named speed and initialize its value to 5. You use the keyword “private” if you do not want any other function, other than the one you use to move the GameObject to have access to the speed variable.
[SerializeField] allows you to view and edit the speed variable in the Editor. If you had set the variable to public, instead of private, you would be able to see and edit the variable in the Editor without [SerializeField].
You will want to make your own movement function and have the Update() function call it to allow for cleaner, more readable code.
Instead of writing “new” in front of a Vector3, you can use properties already available to a Vector3 to direct which way a GameObject will move. For example, new Vector3(1, 0, 0) can be changed to Vector3.right. This still moves the GameObject along the X axis. Vector3(-1, 0, 0) can be written as Vector3.left.
There are properties for each axis. For the X axis, there is Vector3.right and Vector3.left.
| Axis | Property | Value |
| X | Vector3.left | Vector3(-1, 0, 0) |
| Vector3.right | Vector3(1, 0, 0) | |
| Y | Vector3.up | Vector3(0, 1, 0) |
| Vector3.down | Vector3(0, -1, 0) | |
| Z | Vector3.forward | Vector3(0, 0, 1) |
| Vector3.back | Vector3(0, 0, -1) |
Local Space and World Space in Unity
You can add another parameter to the translate() function which specifies if you want to move in comparison to local or world space.
Local space relates to an object moving in comparison to its transform’s axes. World space relates to when an object is moving in comparison to the scene’s coordinates.
For example, if you rotate a GameObject that is moving in its local space, moving forward will always be wherever the transform’s positive Z axis is facing. If you rotate a GameObject moving in world space, then the GameObject’s forward axis can be looking in a different direction from the world space’s forward axis, but the GameObject will always use world space’s forward axis when you want the GameObject to go forward.
So the GameObject’s negative Z direction can be facing the world space’s forward, or positive Z direction, and when the object is moved forward, it is moving forward in world space but backward in local space. Here is the code if you want to use local or world space when moving a GameObject:
//Moving a GameObject based off of it's own transform's X, Y, and Z axes.
transform.Translate(new Vector3(1, 0, 0) * Time.deltaTime * speed, Space.self);

//Moving a GameObject based off of the world's (scene's) X, Y, and Z axes.
transform.Translate(new Vector3(1, 0, 0) * Time.deltaTime * speed, Space.world);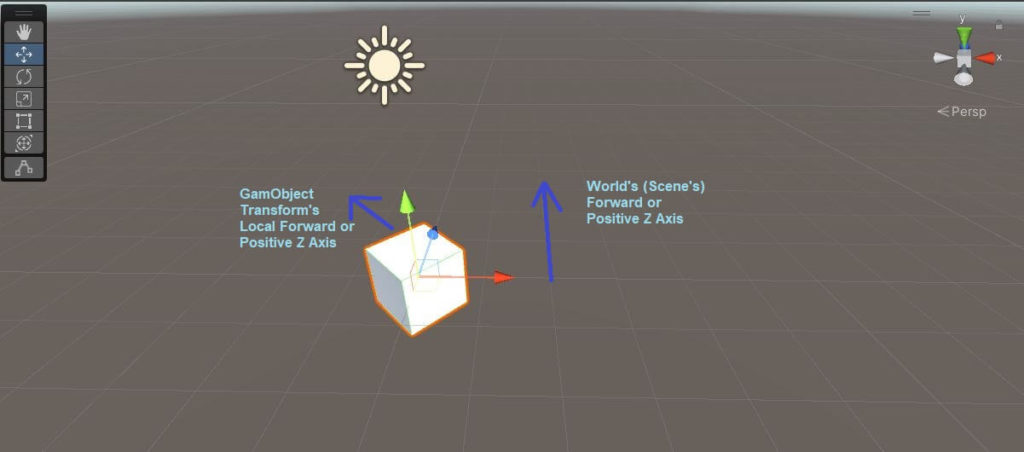
Transform.position in Unity
Similar to transform.Translate, you can also use transform.Position to move a GameObject.
In Unity, transform.Position() is the describes the world position of a GameObject’s Transform component as a Vector. It can be added with another Vector to move a Gameobject around a scene.
By itself, transform.Position() cannot move a GameObject like transform.Translate() does. As mentioned, you add a Vector value to the position to make a GameObject move. Here is the syntax of using transform.Position() to move a GameObject:
using UnityEngine;

public class Movement : MonoBehaviour
{
    [SerializeField] private float speed = 5;

    void Update()
    {
        transform.position = transform.position + Vector3.right * speed *        Time.deltaTime;
    }
}
transform.position = transform.position + Vector3.right * speed * Time.deltaTime); – We start of with transform.position that is a Vector3. It is assigned the value that is on the right of the equals sign. If you just right transform.position, it will get the position of the transform that this script is attached to.
Then using the equals sign, you add the current position of the GameObject’s transform, transform.position, and add it to a Vector. In this case, we use Vector3.right, which moves the GameObject positively along the X axis and multiply it by a speed variable and then Time.deltaTime. This creates similar movement to transform.Translate() from above.
What is AddForce() in Unity?
When working with RigidBodies in Unity, which make use of the physics engine, most of the time you use AddForce() to move.
AddForce() moves a RigidBody by a specific force. It’s parameters are a Vector for the force direction to multiply the force by and also a force mode which allows you to apply several different types of force.
Also, a RigidBody cannot be kinematic when using AddForce. Here is the syntax for AddForce():
public void AddForce(Vector3 force, ForceMode mode = ForceMode.Force);public void AddForce(Vector3 force, ForceMode mode = ForceMode.Force); – public allows the function to be used seen and used by other classes / functions. The keyword void shows that AddForce() will not return any value.
AddForce() has two parameters. The first is a Vector that contains the direction of a specific axis the force will be applied to. The second parameter is the mode, or way, in which the force will be applied. Below is a table with each of the modes and a brief description of what they do.
| Mode | Description | Mass Usage |
| Acceleration | Applies continuous acceleration. | Ignores mass. |
| Force | Applies continuous force. | Uses mass. |
| Impulse | Applies immediate (instant) force impulses. | Uses mass. |
| VelocityChange | Applies instant (speed) velocity change. | Ignores mass. |
ForceMode.Force is frequently used to move a GameObject. In order to use it, you must specify a thrust variable to multiply by the Vector holding the direction the GameObject needs to move. Remember that you must add a Rigidbody component to the GameObject that is moving. Below is an example using Force.
ForceMode.Force applies a continuous force, but when using drag and mass, causes the movement to start off slowly and then increase over time.
using UnityEngine;

public class Movement : MonoBehaviour
{
    [SerializeField] private float thrust = 5f;
    Rigidbody rigidBody;

    private void FixedUpdate()
    {
        rigidBody.AddForce(transform.right * thrust);
    }
}
ForceMode.Impulse is frequently used when a GameObject “jumps.” This is because it causes an object to move immediately with max force. When something jumps, right at the beginning is when the force is used. After a while above off the ground, it will fall back to the ground due to gravity. This is because no more force is being added while in the air.
ForceMode.Velocity applies an instant and continuous speed, ignoring mass. This is similar to Transform.Translate() where there is no acceleration or deceleration. If your speed is five, then as soon as you control the GameObject to move, it will be moving at a speed of five units.
ForceMode.Acceleration, as it’s name implies, causes a GameObject to continuously accelerate. This is different from ForceMode.Force, because it ignores mass.
What is MovePosition in Unity?
Another function to move GameObjects with a RigidBody is MovePosition().
MovePosition() is a function that moves a kinematic Rigidbody to a specific position.
MovePosition() is used less frequently than AddForce() or Translate(). It is used to move a GameObject to a specific position in world space. As the Unity documentation says, it is not used for teleporting. It is similar to moving a GameObject with Translate.Position(). Here is an example below:
public class Movement : MonoBehaviour
{
    [SerializeField] private float thrust = 5f;
    Rigidbody rigidBody;

    private void Start()
    {
        rigidBody = GetComponent<Rigidbody>();
    }

    private void FixedUpdate()
    {
        Vector3 newPosition = transform.position + (transform.right * thrust *                Time.fixedDeltaTime);
        rigidBody.MovePosition(newPosition);
     }
Again, start by declaring and initializing a variable that we will multiply the position of the RigidBody by. In this example the variable is “thrust,” and it has a value of 5. Then make a reference to the RigidBody of the GameObject. In this example we just name it rigidBody with a lowercase r. Then use that to get a reference to the RigidBody component in the Start() or Awake() function.
Vector3 newPosition = transform.position + (transform.right * thrust * Time.fixedDeltaTime); – Here we declare a Vector3 used for the new position of the RigidBody. So we add the current position’s X, Y, and Z coordinates in transform.position to transform.right which is a Vector3 value of (1,0,0) multiplied by our thrust variable and multiplied by fixedDeltaTime to slow down the speed of the GameObject.
RigidBody.Velocity
Finally, another way to move and RigidBody in Unity is using the Velocity property. This property represents how fast a RigidBody’s position is changing. According to Unity, you do not necessarily want to change the value of Velocity directly, because that can cause unrealistic movement. They recommend using AddForce() instead. A code example is below:
public class Movement : MonoBehaviour
{
    [SerializeField] private float thrust = 50f;
    Rigidbody rigidBody;


    private void Start()
    {
        rigidBody = GetComponent<Rigidbody>();

    }

    private void FixedUpdate()
    {
        rigidBody.velocity = transform.right * Time.fixedDeltaTime * thrust;


    }
Again, declare and initialize a value for the velocity, and reference this GameObject’s RigidBody. Then get the RigidBody’s component to change its values.
rigidBody.velocity = transform.right * Time.deltaTime * thrust; – Access the Velocity property, and set it to the Vector3 direction value of your choice. Then multiply it by your velocity variable and multiply it by Time.fixedDeltaTime.
How to Make an Object Move in Unity with Keyboard
You need to use Unity’s Input system to make a GameObject move around in your scene by a keyboard press.
Declare a Vector3 struct, set that Vector3 to a new Vector3 with the Horizontal and Vertical axes from the Input class. Move the GameObject with a function like AddForce() or Translate() multiplying a force or speed variable by your declared Vector3. Use the a, s, d, f or arrow keys to move.
Here is the code below for moving a GameObject with AddForce() using the Input class’ GetAxis() function.
using UnityEngine;

public class Movement : MonoBehaviour
{
    [SerializeField] private float thrust = 5f;
    Rigidbody rigidBody;
    Vector3 inputAxis;

    private void Start()
    {
        rigidBody = GetComponent<Rigidbody>();
    }

    void Update()
    {
        inputAxis = new Vector3(Input.GetAxis("Horizontal"), 0, Input.GetAxis("Vertical"));
    }

    private void FixedUpdate()
    {

        rigidBody.AddForce(inputAxis * thrust);
    }
}
Vector3 inputAxis; – This is a declared Vecto3 struct named inputAxis and will hold the information for the Input class’ Horizontal and Vertical Axes.
inputAxis = new Vector3(Input.GetAxis(“Horizontal”), 0, Input.GetAxis(“Vertical”)); – Here you set the Vector3 input Axis to the premade Horizontal and Vertical axes from the input class. You create a new Vector3 which will hold the X, Y, and Z values for movement. You then multiply that Vector3 by a thrust variable that moves a GameObject.
Note that Input.GetAxis(“Horizontal”) is the X value, 0 is the Y value, and Input.GetAxis(“Vertical”) is the Z value. The Horizontal axis in the Input class is automatically controlled by the A, D, left arrow, and right arrow keys. The Vertical axis in is controlled by the W, S, up arrow, and down arrow keys. These keys are automatically mapped in the Input system, but you can use other keys to control movement along any of the three axes.
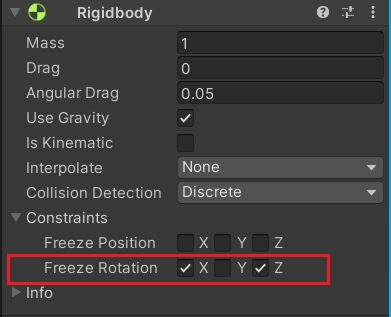
If you use this code to move a GameObject, you will see that moving will cause it to tumble and roll around because the AddForce() function is basically pushing it around. You can stop this by freezing the rotation on the X, Y, and Z axes. To do this, select your GameObject, then go to the Inspector and down to the Rigidbody component.
There you will see Freeze Rotation. Select any axis that you do not want the GameObject to rotate on. Once you do that, you will be able to move without tumbling around. Generally, you will select the X and Z axes. Leaving the Y axis as it is will allow the GameObject to rotate to the left and to the right if that is what you want in your game. But this can differ from game to game.
How Do You Rotate in Unity?
For many games, especially necessary for 3D games, the player will need to rotate along one or more axes to move in different direction. In 2D games you generally rotate along the Y axis. Rotation is critical for any game with an onscreen playable character.
Transform.Rotate()
The Transform.Rotate() function is used to rotate a GameObject around a local transform or world axis. The parameters for the Rotate() function are a Vector3 to describe the degrees of rotation according the X, Y, or Z axis. The second parameter is for how many degrees the GameObject will rotate per a specified amount of time.
Below is a code example for rotating an object in Unity:
public class Rotate : MonoBehavior
{

    public float rotateSpeed = 20f;

    void Update()
    {
         transform.Rotate(Vector3.up, rotateSpeed * Time.deltaTime);
    }
}
public float rotateSpeed = 20f; – This variable will hold how many degrees the GameObject will rotate during a given amount of time.
Rotate(Vector3.up, – Here we have the name of the function along with the first parameter. It is a Vector3 that stores the X, Y, and Z axis values. In this case, Vector3.up is the same as Vector3(0,1,0). The middle value in the Vector3 is used for the Y axis. The Vector3 argument represents the axis by which the GameObject will turn.
rotateSpeed * Time.deltaTime); – The second parameter represents how many degrees to turn by, which is the value of rotateSpeed. Multiplying rotateSpeed by Time.deltaTime will cause your object to rotate the number of degrees in rotateSpeed per second. In this case, the value of rotateSpeed is 20, so the GameObject will rotate at 20 degrees per second.
Note that generally you do not use Translate.Rotate() to rotate a RigidBody. There is another function for that: RigidBody.MoveRotation().
RigidBody.MoveRotation()
MoveRotation() used for rotating RigidBodies. Use this instead of Transform.Rotate().
Here is a code example for RigidBody.MoveRotation().
    Rigidbody rigidBody;
    Vector3 angleRotationSpeed;

    private void Start()
    {
        rigidBody = GetComponent<Rigidbody>();
        angleRotationSpeed = new Vector3(0, 180, 0);
    }

    private void FixedUpdate()
    {
        Quaternion deltaRotation = Quaternion.Euler(angleRotationSpeed * Time.fixedDeltaTime);
        rigidBody.MoveRotation(rigidBody.rotation * deltaRotation);
    }
Vector3 angleRotationSpeed; – This line declares a Vector3 that is used to hold the value that controls how fast the GameObject will rotate along a specific access;
angleRotationSpeed = new Vector3(0, 180, 0); – This line initializes the angleRotationSpeed Vector3 to the value (0, 180, 0). This means that when you multiply this Vector3 by Time.fixedDeltaTime, then your GameObject will be rotating 180 degrees per second on the Y axis.
If the value was Vector3(0, 720, 0) then the GameObject would rotate two full times, or 720 degrees in one second. This is because rotating 360 degrees is one full rotation.
Quaternion deltaRotation = Quaternion.Euler(angleRotationSpeed * Time.fixedDeltaTime); – Here we declare a Quaternion struct. Quaternions are used for rotation representation in Unity. According to the Unity manual, Quaternions are used over Eulers because they achieve more reliable results for incremental rotations. So it is a best practice
We initialize the deltaRotation Quaternion to the value of the Euler values of the GameObject. The Euler values are based on the rotation of the GameObject. Therefore, when you access the Euler values, you can manipulate the values to cause a GameObject to rotate.
Then multiplying the Euler values by Time.fixedDeltaTime will cause the GameObject to rotate over. FixedDeltaTime is amount of time lapsed in seconds at which physics and fixed frame rate updates happen.
rigidBody.MoveRotation(rigidBody.rotation * deltaRotation); – Finally, here we access the RigidBody’s MoveRotation() function. The parameter of that function is the new rotation of the GameObject.
The Quaternion we declared and initialized above that is multiplied by Time.fixedDeltaTime, is now multiplied by the RigidBody’s current rotation. This causes the RigidBody to rotate over time, and in this case, fixedDeltaTime.
Do More With Moving in Unity
Now that you know how to move GameObject’s in Unity, learn more about how you can manipulate that movement. Go here to learn how to clamp movement, stopping it from going passed a specific X, Y, or Z coordinate value. If you want to make a GameObject rotate around, or orbit, another GameObject check that out here.