Make an Enemy Look At the Player in Unity
Sometimes we have dynamic enemies or obstacles in a game and want them to interact with a player. How do we make an enemy look at the player in Unity? Really, how do we make one game object look at another game object?
Use the LookAt(Transform target) function to point a game object in the direction of the other object, which is the target parameter in the LookAt() function. Put this function in the Update() function.
Using the LookAt(Transform) Function
Here are some simple directions to make an object face, or look at, another object. In this example, we will make an enemy game object automatically face the game object controlled by the player.
- Create a game object. We’ll call this “Enemy.”
- Create another game object. We’ll call that “Player.”
- Create a C# script and attach it to the Enemy in the Inspector. From there, we start coding.
- Create a Transform variable to hold the target game object.
- Use the transform.LookAt() function to make the enemy continuously look at the player.
public class Enemy : MonoBehaviour
{
    [SerializeField]
    private Transform target;

    // Update is called once per frame
    void Update()
    {
        transform.LookAt(target);
    }
}
[SerializeField] – This allows us to change variable values in Unity’s editor even if the variable is private. This is a best practice to keep a variable’s data safe from unwanted changes.
private Transform target; – Here we declare a private variable of type Transform and name it target. A transform is a component in unity that stores the “position, rotation and scale of an object” according to Unity’s documentation. We need this data to send to the LookAt() function as a parameter.
transform.LookAt(target); – This is the function that is part of the Transform class. The LookAt() function’s first parameter, where “target” is, tells which game object to point to, or look toward. Notice that this function will cause the game object it’s attached to, to point it’s local forward or positive Z directing face toward the target object.
This is a little confusing, so look at the images below if it will help you grasp this concept better.
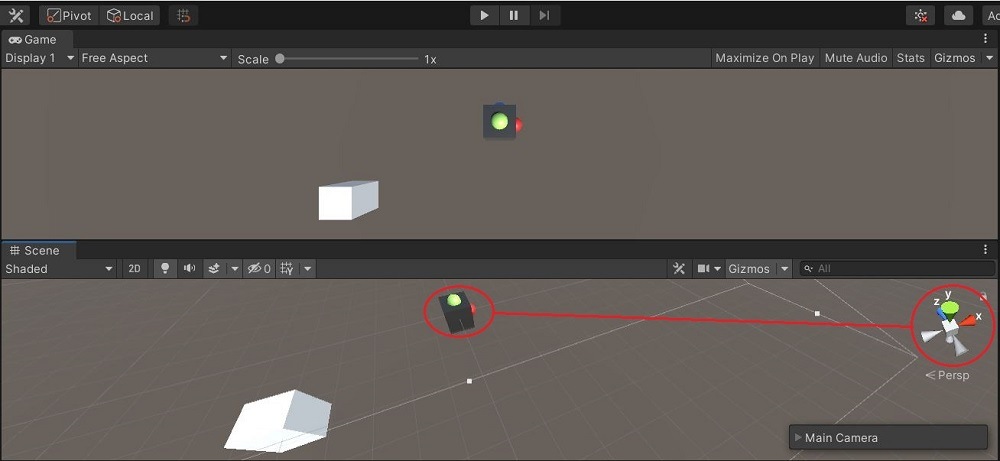
The Game View has the camera facing the top of the objects, while the Scene View is facing the objects from above and behind. The enemy object has the green, red, and blue half-spheres on it to show it’s local X, Y, and Z directions.
You can see the red and green spheres on the game object are facing the same directions as the coordinate compass on the right of the screen. Green, or Y, is on top. Red, or X, is facing to the right. Blue, or Z, is hard to see on the game object because it is facing forward, out of the sight of the camera.
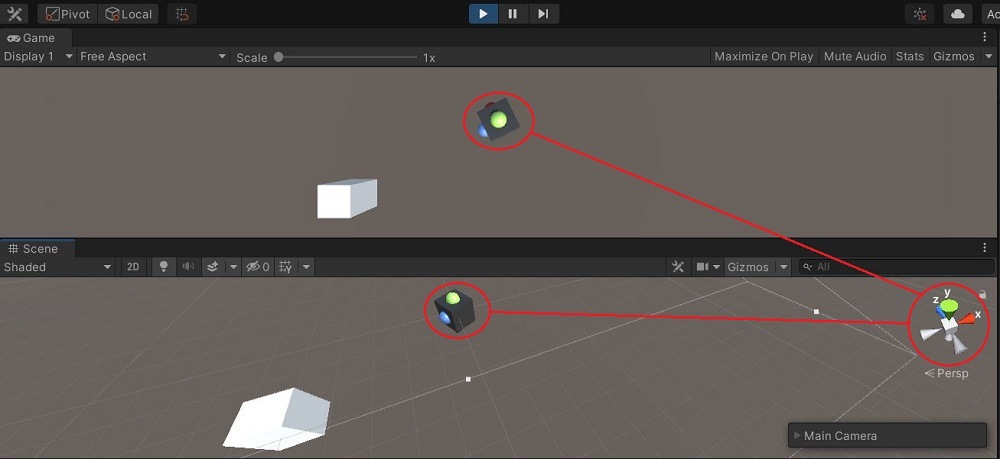
When the game is run, the enemy will automatically rotate its positive Z side towards the target. Because the LookAt() function is called in the Update() function, if the target moves the enemy will automatically look towards its target.
What About the LookAt() worldUp Parameter?
The LookAt() function in Unity has another parameter can be used to change the orientation of the object it is attached to. This is the worldUp parameter. The code is below:
public void LookAt(Transform target, Vector3 worldUp = Vector3.up);We did not use the worldUp parameter in the first example. Because of this, the LookAt() function automatically used the world’s Y axis for the game object’s local Up vector. See the example below:
transform.LookAt(target, Vector3.back);Vector3.back – This parameter is what the game object’s local up direction will be. In this case .back is used. This means that the upward direction of the game object will face the negative Z direction. See the picture below.
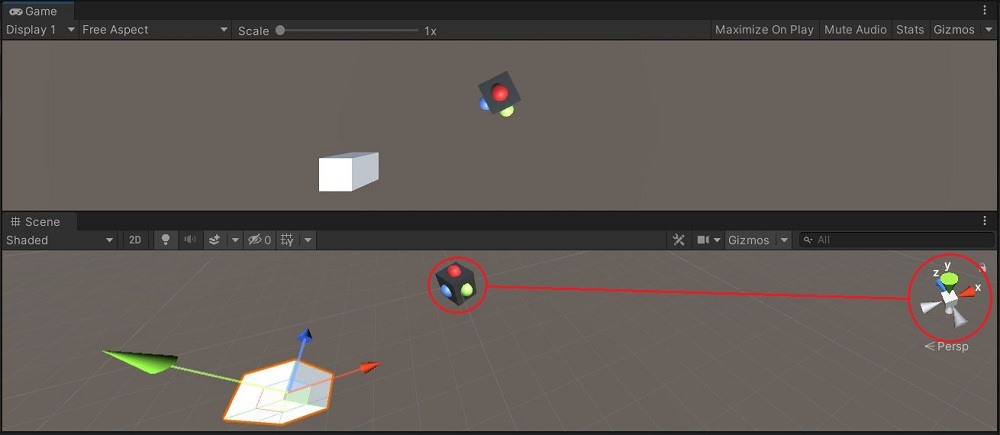
Remember the green sphere on the enemy game object originally pointed upward on the Y axis. Now that we set the worldUp parameter to Vector3.back or facing the negative Z vector, that is where it is now facing. You can see the compass on the right where the darker grey pointer is pointing in the world’s negative Z direction. That is the new “up” direction for the game object.
Rotate Slowly Towards an Object
The LookAt() function automatically snaps a game objects transform so that it looks at the target immediately. If you need a more natural rotation that adds variety or realism to your gameplay, you can use a different method to have the object rotate more slowly and take longer to face its target.
A more natural way to have one object look at another is by using Quaternions and the Slerp function.
Quaternions represent all rotations in Unity. Their values can be interpolated, or altered as a whole, thus allowing you to create new rotations and even smoothly adjust between two rotations.
The Slerp function, Quaternion.Slerp, returns a Quaternion that is “spherically interpolated between” two different quaternions by a certain ratio. This allows for smooth rotation and also slower rotations.
Here is the Slerp code for an alternative to using LookAt():
public Transform target;
    [SerializeField]
    private int speed = 5;

    // Update is called once per frame
    void Update()
    {
        Vector3 relativePos = target.position - transform.position;
        Quaternion rotation = Quaternion.LookRotation(relativePos);

        Quaternion current = transform.localRotation;

        transform.localRotation = Quaternion.Slerp(current, rotation, Time.deltaTime
            * speed);
    }
private int speed = 5; – We declare and initialize a speed variable that will be multiplied by Time.deltaTime to change rotation speed of the object.
Vector3 relativePos = target.position – transform.position; – Here we declare a Vector3 data type and name it relativePos. We then store in it the target’s vector3 position subtracted by the enemy’s vector3 position. This is calculating the relative vector between the rotating game objec and target game object. This is needed for the next line of code.
Quaternion rotation = Quaternion.LookRotation(relativePos); – The Quaternion.LookRotation() function causes the object to rotate towards the target. The parameter of this function is a Vector3 that is stored in the relativePos variable. When you calculate the relative vector between the rotating game object and the target game object, then you can make the Z axis of the rotating game object point to the target’s game object.
Note that you can add another Vector 3 parameter in the LookRotation() function that allows you to tell the function which direction is considered up.
Quaternion current = transform.localRotation; – Here we store the local rotation of the game object in the variable current. We need this for the Slerp() function.
transform.localRotation = Quaternion.Slerp(current, rotation, Time.deltaTime * speed); – Here the Slerp() function takes in the current local rotation of this game object (current), takes the target’s, or end result rotation (rotation), and the speed at which it turns (Time.deltaTime * speed).
The object will now rotate toward any direction and look at the other game object. This can be used for things like turrets and cameras, as well as many other objects in a game.